Unicode output from an Arduino.
I have been working hard on a second edition for my book called "Practical Arduino C". The new edition has an extra chapter focusing on adding an Internet capability to Arduino boards plus some additional data structures. Overall, the text has been polished and the index extended and tidied. I have also changed the way the book is being published and sold. This has halved the retail price while still ensuring fast delivery when ordered from Amazon (Amazon UK link here).
One item that featured in the first edition has been dropped as with hindsight it became clear that it did not add to the reader's learning experience. It made sense therefore to move the section on Unicode output over the Arduino serial interface to a blog post here.
Unicode Characters
The Arduino C is a great tool for manipulating, displaying and communicating ASCII encoded characters, which is perfect if the language you want to use is based upon the Latin character set. Most recent programming languages and all modern personal computers support a form of Unicode, most commonly UTF-8. Unicode has expanded the available character sets to include a vast array of current (and ancient) writing systems including modern Arabic, Chinese and Korean.
As each UTF-8 character is encoded in one or more bytes then it is possible to ma-nipulate Unicode strings in a similar manner to ASCII strings. We can demonstrate that using Serial communications from an Arduino. However, we will need to use something other than the supplied Arduino IDE Serial Monitor window. The Serial Monitor can only display ASCII encoded characters.
For this experiment I am using the widely available PuTTY program which has ver-sions for Windows, Linux and Mac operating systems (see www.putty.org). PuTTY is a free and open source general purpose terminal emulation tool that can connect to remote devices using a wide range of network protocols. We can configure it to use the same serial connection to the Arduino as the IDE and the ASCII based Serial Monitor.
First off, download and install the PuTTY program or alternately any other terminal emulation software than supports UTF-8. I am going to use PuTTY and if you want to use an alternative then you will probably have to make or at least confirm the same settings.
We also need some UTF-8 encoded text for this trial. I did a Google search and came up with a number of samples. I found one on StackOverflow where it was proffered as a sample Gothic string meaning “I can eat glass”. As UTF-8 is the default standard character set for web pages you should be able to copy and paste a sample string into your C program although the IDE will represent the string constant as a series of squares.
If you have problems finding something suitable, you could use the following char array.
const char threeChineseChars[] = {‘\xe4’, ‘\xb8’, ‘\x81’, '\xe4', '\xb8', '\xad', '\xe6', '\x96', '\x87'};
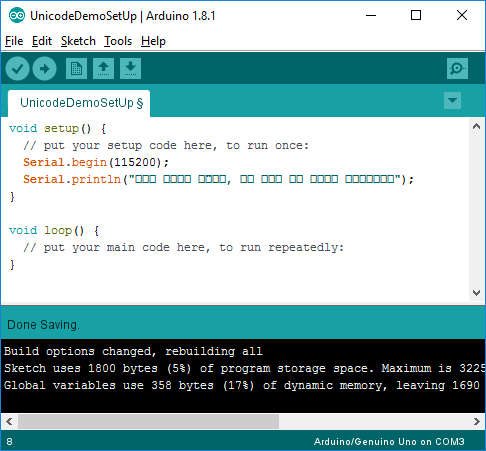
We can test sending Unicode to the serial port with a two line program. This simply sets the Serial object in the setup() function and then prints the UTF-8 encoded string pasted between the quotes to form a string constant. As already mentioned, the IDE does not have direct support for Unicode character sets and the string constant will be displayed there as a series of blocks.

This can be uploaded to the Arduino and then the PuTTY program started and set up to communicate through the same serial port as the IDE.


One item that featured in the first edition has been dropped as with hindsight it became clear that it did not add to the reader's learning experience. It made sense therefore to move the section on Unicode output over the Arduino serial interface to a blog post here.
Unicode Characters
The Arduino C is a great tool for manipulating, displaying and communicating ASCII encoded characters, which is perfect if the language you want to use is based upon the Latin character set. Most recent programming languages and all modern personal computers support a form of Unicode, most commonly UTF-8. Unicode has expanded the available character sets to include a vast array of current (and ancient) writing systems including modern Arabic, Chinese and Korean.
As each UTF-8 character is encoded in one or more bytes then it is possible to ma-nipulate Unicode strings in a similar manner to ASCII strings. We can demonstrate that using Serial communications from an Arduino. However, we will need to use something other than the supplied Arduino IDE Serial Monitor window. The Serial Monitor can only display ASCII encoded characters.
For this experiment I am using the widely available PuTTY program which has ver-sions for Windows, Linux and Mac operating systems (see www.putty.org). PuTTY is a free and open source general purpose terminal emulation tool that can connect to remote devices using a wide range of network protocols. We can configure it to use the same serial connection to the Arduino as the IDE and the ASCII based Serial Monitor.
First off, download and install the PuTTY program or alternately any other terminal emulation software than supports UTF-8. I am going to use PuTTY and if you want to use an alternative then you will probably have to make or at least confirm the same settings.
We also need some UTF-8 encoded text for this trial. I did a Google search and came up with a number of samples. I found one on StackOverflow where it was proffered as a sample Gothic string meaning “I can eat glass”. As UTF-8 is the default standard character set for web pages you should be able to copy and paste a sample string into your C program although the IDE will represent the string constant as a series of squares.
If you have problems finding something suitable, you could use the following char array.
const char threeChineseChars[] = {‘\xe4’, ‘\xb8’, ‘\x81’, '\xe4', '\xb8', '\xad', '\xe6', '\x96', '\x87'};
We can test sending Unicode to the serial port with a two line program. This simply sets the Serial object in the setup() function and then prints the UTF-8 encoded string pasted between the quotes to form a string constant. As already mentioned, the IDE does not have direct support for Unicode character sets and the string constant will be displayed there as a series of blocks.
This can be uploaded to the Arduino and then the PuTTY program started and set up to communicate through the same serial port as the IDE.
Setting up the serial port on PuTTY:

The serial port settings should be the same ones as used by the Serial object (remember that 8 data bits, no parity and 1 stop are the defaults on the Arduino).
Then we need to set UTF-8 as the default character set.

and set the Session to use the serial port.

then click the Open button. Before you do, you might like to give the session a name (in the text box marked as “Saved Sessions” and click the Save button as you can then retrieve your settings on a subsequent occasion by clicking the session name you used and then the Load button.
Putty can then connect to the serial port that is connected to the Arduino and the Unicode string should be correctly displayed. You can always use the re-set button on the Arduino to re-send it to PuTTY.

And there was my Gothic text displayed.
I thought it would be interesting to change the setup() function to measure the length of the Unicode string.
void setup()
   // put your setup code here, to run once:
   Serial.begin(115200);
   const char utf8[] = "𐌼𐌰𐌲 𐌲𐌻𐌴𐍃 𐌹̈𐍄𐌰𐌽, 𐌽𐌹 𐌼𐌹𐍃 𐍅𐌿 𐌽𐌳𐌰𐌽 𐌱𐍂𐌹𐌲𐌲𐌹𐌸";
   Serial.println(utf8);
   Serial.print("String length: ");
   Serial.println(sizeof(utf8))
}
The PuTTY program should be closed before attempting to upload any program changes through the serial port – otherwise you will get an error message to tell you the upload failed.
After the upload, restart PuTTY and connect the session to the same serial port.
The size of my UTF-8 string was 127 bytes. We can assume that the string was termi-nated by a null character so 34 UTF-8 characters used 126 bytes of memory. The Gothic characters look like they are using 4 bytes. (I looked up the first character and found it was encoded as U+1033C).
If you need some form of Unicode output then you will probably want to create your own string of character constants to use when required. You will therefore need a way to encode UTF-8 as an array of char. Earlier in this section I suggested a program line that could be used to create a UTF-8 string of three Chinese characters.
const char threeChineseChars[] = {‘\xe4’, ‘\xb8’, ‘\x81’, '\xe4', '\xb8', '\xad', '\xe6', '\x96', '\x87'};
Each if these characters are encoded using three char values expressed in hexadeci-mal notation. Other Unicode writing systems may use fewer or more bytes for each character.
I found a web page that listed the Unicode table for the Simplified Chinese Character set. This included the character codes in hexadecimal notation. One used above was given as E6 96 87 in hex but note the format I used in the code line above.
Alternately, I could have defined the char values in decimal as:
const char threeChineseChars[] = {-28, -72, -127, -28, -72, -83, -26, -106, -121, 0};
UTF-8 uses variable lengths (as a byte count) starting with single bytes for those char-acters that are the same in ASCII encoding. Such variability could make receiving and storing UFT-8 characters a little complex to start with.
One good thing to take away from this experiment is that the Arduino USB serial in-terface can be used by any program running on your PC (or any other device acting as a USB host). Thus, an Arduino can become a data collection device or actuator working in tandem with a PC. Also, a PC could provide data processing services to an Arduino. The newer 32 bit Arduinos enhance support for this sort of activity by providing two USB ports with one intended to be used for program downloads and the other for general serial communications.
Further thought
I have recently undertaken a couple of Arduino based projects using the new MKR WiFi 1010 and taken advantage of the opportunity to serve an HTML/JavaScript/CSS interactive user interface. This form of microprocessor/human interface can make extensive use of the available HTML symbols and the huge resource made available by UTF-8. Looks like the way of the future.
<updated 30/06/2020 to add a link to the 2nd edition of my Arduino C book>
Comments
Post a Comment