Arduino User Interfaces
Back when the Arduino project was getting under way and indeed when most of us started to get to grips with controlling a brilliant low-cost microprocessor like an Arduino Uno the concept of a program user interface (UI) would have been something of a joke.
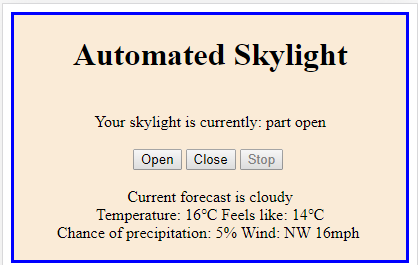
The final chapter of my book on Arduino C programming built upon the capability of an Arduino MKR WiFi 1010 board to serve a UI to any device on a local network with a Web browser – all to control the project’s skylight closer. The intention was to show that any suitable Arduino project could be extended to include an effective user interface over WiFi.
The User Interface was clearly a key component of the project and I though a good demonstration of the concept. One can imagine w lot of microprocessor projects that could be enhanced with an effective UI.
A popular Arduino project is to set up an automated plant or seedling watering system as that makes use of sensors and activators. If the plants are outdoors you could conceive of extending the basic project to include a weather forecast and suppress watering if rainfall was expected. You might wonder if, when rainfall had only a median predicted value, the project owner should be consulted by the system. This could involve a small LCD screen, the sending of an email or a detailed web page. There are lots of possibilities and I can see more UIs becoming key components of microprocessor-based systems.
My fun Arduino based Sudoku solving project also included a version that served an interactive user interface to a web browser using HTML, JavaScript and C code running on that same MKR WiFi 1010.
My recent post on using the Visual Studio Code IDE to develop Arduino projects (perhaps as an alternative to the upcoming version 2 Arduino IDE) was mildly positive, I think. The biggest problem was to do with the very underwhelming version of the Serial Monitor. My suggestion was to use the wonderful putty program as an alternative. The separate and freestanding putty window would be closer to the original (version 1 Arduino IDE) concept that is, I think, superior in practice. I always found it helpful to be able to position the Serial Monitor at one edge of my computer monitor screen away from the IDE when running tests.
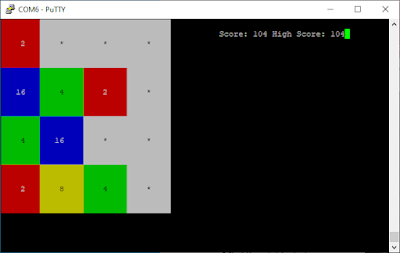
I have previously suggested the putty program as an effective user interface when blogging here about my 2048 program and my Arduino based BASIC (programming language) interpreter. The 2048 game runs on an Arduino Uno and makes use of the putty emulation of a VT100 terminal. [I am old enough to have used VT100 terminals for commercial projects – heavens, I go back to the VT52 and even printer terminals.] The BASIC interpreter might have been a bit eccentric but who has not fancied creating a programming language even if only (as in my case) yet another dialect of BASIC.
Given that the VS Code Serial Monitor is (currently at least) just a little sub-par and that both that version and the new Arduino IDE version 2 confines the Serial Monitor within the boundary of the IDE window it may be that putty or an equivalent program should become our default tool.
I also wondered just how difficult it would be to build an alternate Serial Monitor dedicated to our use cases. My first stab at emulating the version 1 Arduino IDE Serial Monitor only took a couple pf hours to get to the point of proving the concept. Most of that time was trying to remember how to write C# Windows Forms and raiding Stack Overflow for some hints on interacting with a COM port. Took a while longer to get all the details (like timestamps and auto scrolling) working well but I am pleased with the result.
Note that I had to add a control to select the COM port and that I moved some of the controls around to more logical placings and groupings – well, from my perspective.
Next step is to do the same again with a “terminal” style interface and then to go the whole hog on a VT100 emulation. Combining the three into a single UI would be the perfect end point.
<Addendum 16/09/2022>
Terminal Mode prototype up and running (in dark mode)
VT 100 emulation looks a bit tougher but I have an idea on how to tackle it sensibly...
<Addendum 26/09/2022>
Famous last words there as a VT100 emulation using Winforms proved difficult.
My first attempt involved drawing each character on the window with the appropriate attributes. VT100 escape sequences being interpreted to position any following character stream arriving via the COM port. Those escape sequences can even detail foreground and background colours. What I was after was a reasonable stab at what putty can do.
The above image is a screen shot of putty being used to play 2048 on an Arduino.
My effort proved very slow. Everything worked but the result was not going to prove satisfactory.
I had another try using a RichTextBox. The control proved fast enough and is certainly capable of handling areas of text with varying background and foreground colours but - well there were a lot of buts. The control was designed to interact with a user and was more than clunky when attempting to vary the text content programmatically. Indeed, the "gotchas" piled up and after a sequence of attempts to bend it to my will I had to give it up as a lost cause.
So maybe I will use my emulation of the Arduino IDE version 1 Serial Monitor (indeed I did when trying to debug my VT100 code) but putty still rules.
<edit 15/11/2022>
While working on another personal project I discovered that (from Windows 10 onwards) the windows console supports ANSII/VT terminal escape sequences.
So I now have to diary another try based upon a Windows console app.
<edit 13/12/2022>
It is easier to run VT100 emulation in a Console from C++ and easier to manage a COM port from C#. So my C# console solution to VT100 emulation needed to do some C++ style stuff by using System.Runtime.InteropServices and some functions extracted from the kernel32.dll. Key thing is it comes together nicely and you can see my proof of concept happily interacting with my Arduino based 2048 game in the image below.
Happy to publish my code here if anyone is interested. Leave a comment to let me know.


Comments
Post a Comment